Wednesday, January 11, 2012

Ashleigh's Dining Chairs

Okay folks, this is gonna be a long one. It's appropriate because these particular chairs taught me a lot. They taught me not to pre-quote or under quote on hand painted detail pieces. They taught me that the hardest work isn't the work that makes you sweat, but the work that is tedious. My mind doesn't handle tedium well. However, having said all that, these chairs also taught me what I am truly capable of with furniture painting and upholstery and I loved learning that. Ashleigh found these chairs at a cute little shop here in town and wanted me to come and look at them right away. Based on the size of her dining table I was taken aback. These chairs seemed small. But, when we started talking about ideas everything seemed to make sense. These are the chairs before, sad upholstery and a little beat up


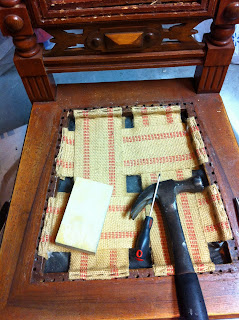
And without the fabric as I started stripping them down


As far as color goes, you may think we're crazy at first to mix navy with a black and white striped table, but bear with me. I promise it works. Though I will say the paint terrified me when I first started spraying. Wet it looked royal blue instead of navy!

Wet


Dry


Next comes the part that showed me what I was made of. I would paint until I started shaking and had to quit, then I'd start again the next day. It takes TIME to do this people. Lots of time!


Next comes the upholstery. Would I have chosen this fabric if the chairs were mine personally? No, I honestly wouldn't have. But, this fabric is SO Ashleigh and her family. It totally works for them and lends a quirky and eclectic feel to the dining room, which is what she was going for in the first place.

Here is the fabric on the chair before piping:


Now comes the next tricky part. Before the summer of 2011 I had never used a sewing machine. I could sew on a button, but I didn't have a lot of experience at all and no real desire either. My mother is an amazing seamstress and so I always let her do it all. I suddenly realized I was going to need that skill if I was going to do any upholstery or make things for my daughter. Anyhow, sorry for the aside, I learned just enough this summer to make me think I could do more. Make my own double welt piping? SURE! Why not? So, that's what I did...under my mothers supervision.


It WORKED!!! Woot! Now to finish these babies!!!


The finished chair


At the table, while still showing you as little as possible. I'm going to take great pics when we are completely finished with the entire space.


Front side by side


And the finished back


I am so pleased with what I accomplished with these chairs. I'm not gonna lie, it was a TON of work. But, Ashleigh loves the chairs and the space is really coming together now.  It has been a blast working for Ashleigh and really she has given me the opportunity to learn so much about what I love to do! I can't wait to show you all the finished space, so stay tuned ;)

Jade's Furniture

This past summer I went to an estate sale with my friend Monica and just happened upon a furniture set that I just knew went in my daughter's room! Old pieces yes, but the lines were oh so pretty and I just couldn't resist. So I called up the hubby and asked him if I could buy them. After some negotiations I was given the green light and just went for it! It was a chest of drawers and an old vanity. As soon as my husband and his best friend brought the furniture home I tore into the vanity...almost forgetting to take a picture first, but I remembered at the last minute! I knew I wanted to take the vanity apart and make them into nightstands. Jade didn't have a need for a vanity nor did she have the space. We have a tiny little house and her room is pretty tiny too. This is what I had when I got started:

This was my happy little helper who decided helping was nailing about 200 nails into my stool.


Primed and painted with 2 coats of china moon white


After adding the stripe that I mixed the color for myself


Jade Reese when she saw it for the first time :) I love that little girl! She makes me smile.


Now onto the chest of drawers. Here is what it looked like before. I had to enlist my father because some of the drawer bottoms were slightly warped and we had to rebuild one altogether.


Painted and in place now, don't you just love the rustic hardware? 


Painters tape had to suffice...the knobs I wanted were on back order. I got them in teeny tiny numbers so it took a while before I could get a true finish picture.


At the same sale I also found a cute little stool. Her bed is iron and a bit tall so I thought it would make a super cute little foot stool for her to climb into her bed with. This is the little stool before:


And this is after


I think the duchess is pleased. Much more to come and one of these days I will show off the entire finished room!

Tuesday, December 6, 2011

Ashleigh's Buffet

Usually I have a at least somewhat of a before picture to show of a piece I am working on. However, I don't have a fancy-schmancy camera like so many other bloggers and I use my phone. I also have two children that are crazy about Angry Birds and taking pictures with the phone camera...this leads to bad things for me. Pictures that I wanted to keep forever somehow get deleted when my little girl plays with my phone. Three completely fantastic before pictures were deleted! In their place I have lovely video of my daughters nostrils and her favorite stuffed animals singing Taylor Swift's 'Mean'. Funny yes, but not so great for the blog about said furniture piece.

Moving on, I do have a few pictures of the color that the buffet was before  I began. This is the front of one door already partially sanded


This is the large drawer sitting on top of my husbands mobile wash trailer. The trailer is a GREAT work surface for me because I'm short, but my husband absolutely hates that I use it. It is a testament to how much he loves me that he puts up with that!


This is the piece mostly primed. The weather did not cooperate for me during this time! We had a dirt storm that made the news it was so bad. So, I had to sand and pretty much start over. 


This is the dirt storm heading toward my house the day I had the buffet fully primed.


It was massive, nasty, and so gross. I cleaned my house for a few weeks afterward and found more dirt every time! So after everything was redone I got back to the fun part. The paint is a soft gray from Benjamin Moore called Smoke Embers. It was the perfect color to use on a classic piece like this.


I also painted the inside with a Valspar color I love called Atlantic Gray. It's almost a robins egg color and I thought it would make for a fantastic pop of color when you opened up the piece.
When all was said and done I think it is so much more elegant than before. The knobs and pulls of any piece are it's jewelry and can absolutely make a piece shine. That is doubly true for this buffet! The knobs are gorgeous and were totally worth the wait of being back ordered.


This is the finished buffet in its place. Ashleigh has her beautiful home all decorated for the holidays and the buffet looks perfect!


She says she falls in love with the piece more and more every day and I love knowing that I have a happy client.


Now onto the next project. Stay tuned...


Wednesday, November 16, 2011

The Little Things

I've needed something for my entryway for a long time. I used to have an over-sized black frame hung on that wall with nothing in it long before such a thing was fashionable.  When our son started kindergarten we needed a "command center" of sorts. A place to hang the monthly school calendar and write notes to each other about important things to remember. Needless to say the giant black frame was filled with corkboard and dry erase board. I was left with a naked entry wall. My son is now in 2nd grade so it was way past time to take care of this area. You all know how it goes though, kids, husband, and other more important things like renovating a bathroom took priority and the sad little entryway got put on the back burner. Then I got on Pinterest one day and saw an old picture from Martha Stewart of pretty yellow frames over a decorative bench. It all just fell into place. I had a bunch of frames and my mother had a bunch of frames so I thought 'why not?' it would make something sentimental out of it. I ended up with a mix of very sentimental frames like the one that held my brothers baby picture from the hospital and the very first frame I bought for my first apartment. But then I needed to fill in with some others. I didn't want all mass produced frames available anywhere so I went to antique shops. I found these frames:


After I got these  frames I was just positive I had enough to fill in the gaps. I didn't and ended up getting some smaller frames at Hobby Lobby and using them as filler after all.


After  I  got them all hung in their final place, some in their raw state or some already painted from a different idea, I had to come up with a color scheme. This went through many phases but what I ended up with was great!


All primed

This is what I have ended up with. I sprayed them all front and back with flat white spray paint and then glazed them with Valspar's asphaltum. I'm so glad they all turned out just the way I wanted them. 


The frames I purchased now have some sentimentality to them as well. I just love looking up at the wall and seeing frames from my parents and frames from my first place and knowing that there is history there. It may seem corny to some, but it's those littlest of things that make a place feel like home to me. When I look around my home I'm finally starting to see the same type things that  I loved growing up.The small things that make you feel warm and cozy, the love poured into the home, kids drawings on the fridge. I hope I'm instilling these same things in my own children. That one day they will look back and be able to see and feel all the little things.

Tuesday, November 15, 2011

Jade's Desk and Chair

Okay, so a while back I did a post on a little accent table that resulted from tearing the top off a table I adored. This is the 'sister post' to that post. The table that I adored the legs on needed a function in my house. I had originally seen it in my living room somewhere, but I just couldn't make it fit in. I HAD to use this piece! It was my favorite piece I had gotten from my mother-in-law this summer. I was about to sacrifice building my entry bench and just using the table there, when I had another bright idea. I had just put a small desk on hold at a local antique shop for my daughters room. I loved it but was going to have to pay it out in three payments. I suddenly thought to myself that this table would make such a cute desk in my daughter's room. So there it was, my idea completely gelled and the lovely ladies at the antique store were very kind about letting me out of my deal with them (I'm fairly certain it's because I buy a ton of stuff from them). So I got started! The original top was very worn and had a center seam. After I ripped that top off I made one half into a table for me and one half into a table for a friend. So now I had these awesome legs and no top...what to do?


I went to my father for brainstorming ideas and this is what we came up with to make a top on the cheap. Get two 1x10's and use biscuits to join them and make a seamless top. We honestly couldn't figure out the type of wood the table legs were. There were so many layers of finishes and even some stripper that had been allowed to dry on the piece. We ended up saying that it didn't really matter since I was painting it anyway and we went with a beautiful piece of poplar.


This is cut to size and glued with biscuits


All dry and now I am filling the seam with wood filler so the top will look completely seamless


Me trimming off the rough ends before tracing the pattern on the top. After the pattern was traced, I let my fathers very practiced hand take over...I was chicken and didn't want to ruin the piece and I haven't used a jigsaw all that much. So he cut out the shape and then I sanded the sucker down. It took a fair amount of sanding to make it look seamless and get it ready for the router. When it came time to make the decorative edge I went with something that looked similar to the edge of the original. This is the finished project reattached to the legs.


Next came painting and my daughter's joy when she came home from school and found she had a desk in her room. I had planned to stage the desk and make everything look fancy, but I just couldn't do it! This is how the desk looks daily. Jade is a sweetheart and uses her desk all the time and I thought it was so precious the things that she finds worthy of her desk.


Like mother like daughter right? I love that she has a Benjamin Moore stir stick in her pencil holder and paint chips from every store we enter that has them stacked in her bowl - it makes my heart happy!


I'm sneaking in this picture because I wanted everyone to see what her chair looked like the day I found it. I got this chair for $15 and then realized I paid too much! It was rickety and ended up requiring about 12 hours of work in order to tighten it up. But it was worth it in the end. I sprayed it dark purple and covered it in one of Jade's key fabrics from her room, then I repeated the same fabric on her pin board. I love it and Jade really loves it. All is well, and the baby girl now has a place to do her kindergarten homework.