Monday, September 28, 2015

Luke's Nursery

Last April I did several pieces for a nursery and it just so happened to be for one of my favorite people ever, my photographer and friend Monica! Her baby boy Luke is the most adorable little guy.

I made a little toddler quilt.


(photo by Shine a Little)

(photo by Shine a Little)
I made a pin board

(photo by Shine a Little)

(photo by Shine a Little)
The crib skirt (the bumper was made by her mother-in-law)

(photo by Shine a Little)

(photo by Shine a Little)

(photo by Shine a Little)
I also made a pillow and reupholstered a chair


Huge cord for oversized piping


(photo by Shine a Little)

(photo by Shine a Little)

(photo by Shine a Little)

(photo by Shine a Little)


That sweet boy, snoozing on his chair!


This was such a fun project for me to be a part of and I'm overjoyed to see how loved and lived in this space is! Thank you Monica for letting me help make your little boy's room so special!


Wednesday, September 23, 2015

Saving a Table

I was planning to just reveal this table with the entire kitchen renovation, but this table seriously deserves it's own post. One of my amazing friends actually found this table for me during my first boutique sale. She hit my sale first and then spend the day with her daughter going to garage sales. She found me this table and a beautiful antique desk. Since I couldn't lave my sale, she even hauled the pieces back to me.
This table though...I mean wow. It was in the worst shape! 
Here is what I started with:


You can see here that I had already removed a lot of the black and white checkerboard contact paper from one side. The other side was spray paint. It took stripping, sanding, goo gone, wiping down with mineral spirits. You name a way to get paint off and I did it! I finally had the table down to raw wood.


I wanted to make my own stain to get the type of distressed look I was going for. I learned a lot with this. I will make a completely different post on this later.


It was so so so pretty...before the polyurethane.


However, when the poly was applied, the darker strips turned full on black.  I could not have been more sad!
So I sanded it down again and applied a gray stain.


I painted out the base and distressed it for a cottage feel.


I love the imperfections and the gray wash of color. It works perfectly for the space and I can't wait to do the full reveal on this kitchen renovation!

Don't forget the Boutique Sale this weekend! Come and see me! You can find all of the details of the sale on the Facebook page Peacock Door Designs by Paula Taylor


Monday, September 21, 2015

Customizing Pieces

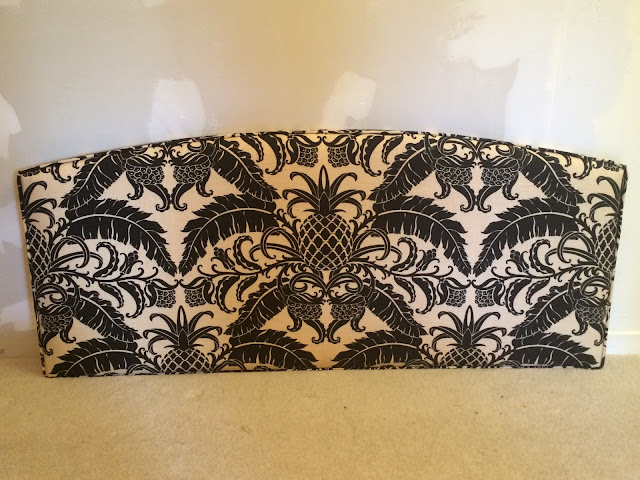
This is the perfect example of awesome furniture makeovers in my opinion. I had a headboard that I couldn't use and I had a client looking for one. What I had was NOT what she wanted, but I promised that I could make it look like what she had in mind.

This is what I started with:


Not bad really, just blah. So I decided to up the luxury and glam a bit with some foam and fabric. The detail of the crisp piping just makes it!


I love the curve of the headboard now, it just makes it seem so unique.


Once more, the makeover:

The same client was looking for a dresser for that same bedroom and I lucked into this one. I wanted it immediately because I loved how the curve on the top drawer matched the headboard. Perfection! The only issue was the dresser was a bit dated. The cravings weren't what she was looking for and the finish was worn down.


So, I filled int the carvings, cleaned up the piece, painted the top black and the base cream. Now all we needed was a little hardware, or as I call it furniture jewelry!


I can't wait to show you the finished space, but I hope you enjoy my sneaking in these two previews!


Monday, September 14, 2015

Repurpose: TV to Console Cabinet

My friend Monica was cleaning out her barn and had a couple of old TV cabinets. She let me pick one and gave it to me just to get it out of her space. It was in rough shape. The old television had already been removed but I was needing something specific. 
Here is what I started with:


Yes, that is nasty green felt on the interior. one of the problems I had with the piece was that it was too deep for the space I needed to put it. So I measured to the depth I needed and made the cuts!


The next problem was the holes in the base for the original electrical and lack of a back after cutting it down. Plywood was cut and inserted, a shelf was made, the legs were reattached, and a new back was made. Then came time to strip and stain the top. There was a lot of water damage and the finish was a tad orange for my taste. 


I wanted an extremely smooth top so I did some wet sanding with a nice slurry and the top is like glass now. You would never know that it was ever damaged! I'm so glad that worked out like I had planned, things rarely work out that easily when you're refinishing!


I painted the interior and exterior to match my decor.


I distressed the creamy white paint and waxed the piece before putting it into place. I'm so please with this. It has made storing all the DVD's and other media books look so much better!


Now I just need to get that last wall painted and the living room will be so much brighter and nicer.